Orchestration with Nomad
When I think about orchestration, Kubernetes is something that easily comes up to my mind. With its massive ecosystem and all the different companies, that provide even more services, it is a big solution to even bigger enterprisy problems.
On multiple occasions, I thought about setting up a small Kubernetes cluster on my own, but to be honest the initial drag to get it running usually beats my original usecase and every bit of motivation.
Isn’t there something lightweight?
What is Nomad? &
Nomad is a small job scheduler and orchestrator from HashiCorp and relies on plugins to run nearly anything - given that there is a proper task driver.
There is an exhaustive list of provided task drivers like Docker, Java or raw/exec to name a few and some of them are community-driven. Docs how to provide new ones are also available, so expect this list to grow even further.
Before we can start playing with the actual objects, we have to talk about configuration.
Configuration without YAML &
By design, Kubernetes follows a declarative approach and allows to specify the desired outcome of your objects in a YAML file. If you want to change something programmatically or even parameterize you can either use the API directly and patch your objects or rely on tools like helm or kustomize.
Nomad follows a similar approach, but utilizes HashiCorp's own configuration language HCL, which was initially introduced for Terraform to add logic to the mix without the syntactic weirdness of jsonnet or Docker's CUE.
Here is a quick example, but more about it can be found on the official page:
name = "unexist"
message = "Name: ${name}"
loud_message = upper(message)
colors = [ "red", "blue" ]
options = {
  color: element(colors, 1),
  amount: 100
}

configuration {
  service "greeter" {
    message = loud_message
    options = var.override_options ? var.override_options : var.options
  }
}
Keep that in mind, this might be handy later.
Working with jobs &
When you want to run something on Nomad, you normally start with a job. A job - or rather a job file - is the primary work horse and describes the tasks you want to run in a declarative way.
Behind the scene, whenever a job is submitted, Nomad starts with an evaluation to determine necessary steps for this workload. Once this is done, Nomad maps the task group of our job to a client node and schedules it there - this is called an allocation.
There are many different object types, but it is probably easier just to start with a concrete example and explain it line by line as we go:
job "todo" {
  datacenters = ["dc1"] (1)

  group "web" { (2)
    count = 1 (3)

    task "todo" { (4)
      driver = "java" (5)

      config { (6)
        jar_path = "/Users/christoph.kappel/Projects/showcase-nomad-quarkus/target/showcase-nomad-quarkus-0.1-runner.jar"
        jvm_options = ["-Xmx256m", "-Xms256m"]
      }

      resources { (7)
        memory = 256
      }
    }

    network { (8)
      port "http" {
        static = 8080
      }
    }
  }
}| 1 | Sets of multiple client nodes are called a datacenter in Nomad. |
| 2 | Groups consist of multiple tasks that are run together on the same client node. |
| 3 | Start at most one instance of this group. |
| 4 | This is the actual task definition and the smallest unit inside of Nomad - like a Pod. |
| 5 | The Java task driver allows to run a jar inside of a JVM. |
| 6 | Config options for the chosen task driver. |
| 7 | Resource limits can also be set - here we stick with limits for memory. |
| 8 | And additionally network settings for the whole task-group. (We need the port definition later) |
The next steps assume you’ve successfully set up and started Nomad, if not please have a look at the great resources here.
How to start a job &
There are multiple ways to interact with Nomad:
Via browser &
There is a small web-interface available right after start: http://localhost:4646
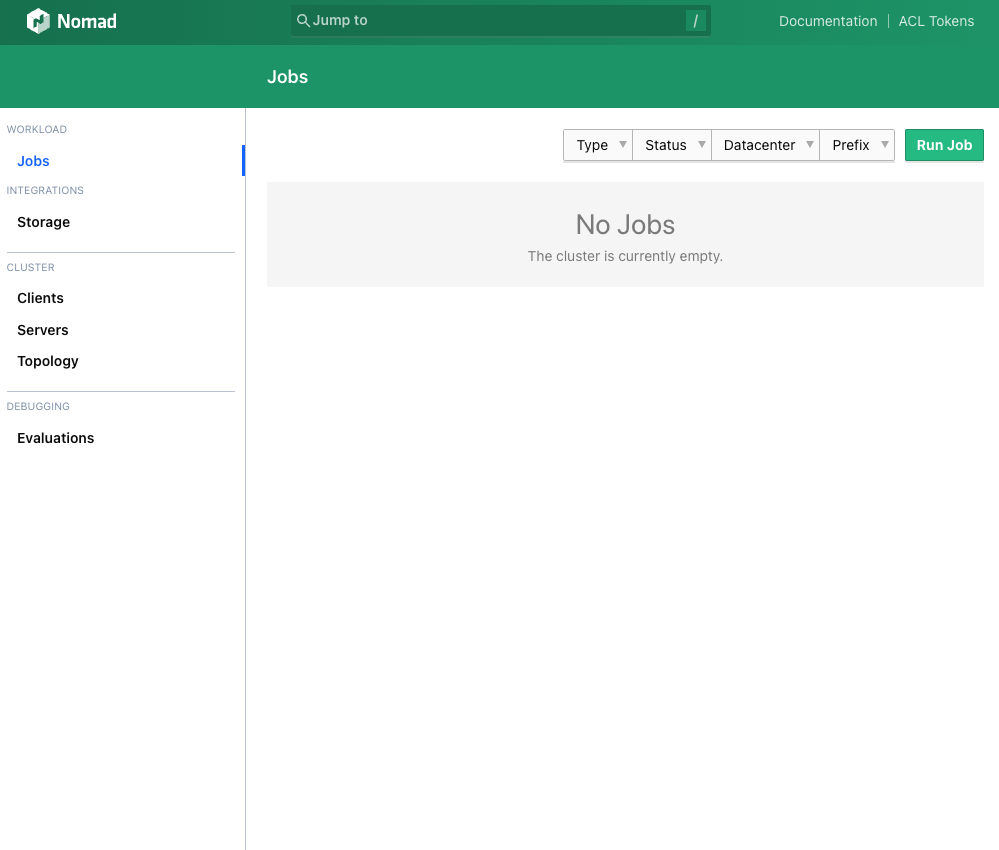
After pressing the Run Job button in the right upper corner, you can paste your job definition either in HCL or in JSON.
The Plan button starts a dry-run and Nomad prints the result:
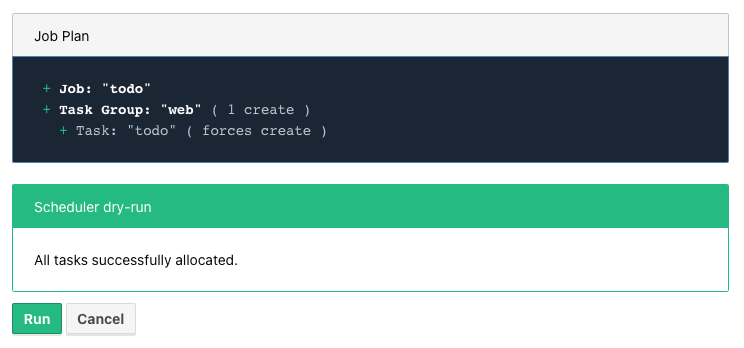
And a final press on Run starts the actual deployment.
Via commandline &
For the commandline-savy, there is nice CLI shipped within the same package:
$ nomad job plan jobs/todo-java.nomad
+ Job: "todo"
+ Task Group: "web" (1 create)
  + Task: "todo" (forces create)

Scheduler dry-run:
- All tasks successfully allocated.

$ nomad job run jobs/todo-java.nomad
==> 2022-07-18T17:48:36+02:00: Monitoring evaluation "2c21d49b"
    2022-07-18T17:48:36+02:00: Evaluation triggered by job "todo"
==> 2022-07-18T17:48:37+02:00: Monitoring evaluation "2c21d49b"
    2022-07-18T17:48:37+02:00: Evaluation within deployment: "83abca16"
    2022-07-18T17:48:37+02:00: Allocation "d9ec1c42" created: node "d419df0b", group "web"
    2022-07-18T17:48:37+02:00: Evaluation status changed: "pending" -> "complete"
==> 2022-07-18T17:48:37+02:00: Evaluation "2c21d49b" finished with status "complete"
==> 2022-07-18T17:48:37+02:00: Monitoring deployment "83abca16"
  ✓ Deployment "83abca16" successful

    2022-07-18T17:48:47+02:00
    ID          = 83abca16
    Job ID      = todo
    Job Version = 0
    Status      = successful
    Description = Deployment completed successfully

    Deployed
    Task Group  Desired  Placed  Healthy  Unhealthy  Progress Deadline
    web         1        1       1        0          2022-07-18T17:58:46+02:00
Via API &
$ curl --request POST --data @jobs/todo-java.json http://localhost:4646/v1/jobs
{"EvalCreateIndex":228,"EvalID":"bd809b77-e2c6-c336-c5ca-0d1c15ff6cce","Index":228,"JobModifyIndex":228,"KnownLeader":false,"LastContact":0,"NextToken":"","Warnings":""}| You can find the example in JSON here: https://github.com/unexist/showcase-nomad-quarkus/blob/master/deployment/jobs/todo-java.json |
Check status of a job &
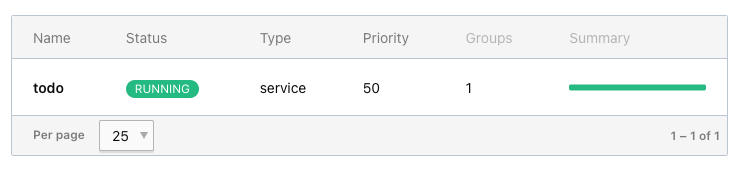
The status of our job can be queried in similar fashion:
$ nomad job status
ID    Type     Priority  Status   Submit Date
todo  service  50        running  2022-07-18T17:48:36+02:00
Or just use curl to access our service directly:
$ curl -v -H "Accept: application/json" http://localhost:8080/todo
*   Trying ::1...
* TCP_NODELAY set
* Connected to localhost (::1) port 8080 (#0)
> GET /todo HTTP/1.1
> Host: localhost:8080
> User-Agent: curl/7.64.1
> Accept: application/json
>
< HTTP/1.1 204 No Content
<
* Connection #0 to host localhost left intact
* Closing connection 0
Stop jobs again &
And without more further ado - jobs can be stopped like this:
$ nomad job stop todo
==> 2022-07-18T18:04:55+02:00: Monitoring evaluation "efe42497"
    2022-07-18T18:04:55+02:00: Evaluation triggered by job "todo"
==> 2022-07-18T18:04:56+02:00: Monitoring evaluation "efe42497"
    2022-07-18T18:04:56+02:00: Evaluation within deployment: "577c3e71"
    2022-07-18T18:04:56+02:00: Evaluation status changed: "pending" -> "complete"
==> 2022-07-18T18:04:56+02:00: Evaluation "efe42497" finished with status "complete"
==> 2022-07-18T18:04:56+02:00: Monitoring deployment "577c3e71"
  ✓ Deployment "577c3e71" successful

    2022-07-18T18:04:56+02:00
    ID          = 577c3e71
    Job ID      = todo
    Job Version = 2
    Status      = successful
    Description = Deployment completed successfully

    Deployed
    Task Group  Desired  Placed  Healthy  Unhealthy  Progress Deadline
    web         1        1       1        0          2022-07-18T18:12:24+02:00
Advanced topics &
So far we have covered the plain basics and we know how to set up, check and stop jobs now.
It is time to talk about the interesting parts now - otherwise the whole mention of Kubernetes would be quite pointless, right?
Scaling out &
Running only one instance doesn't really justify the use of an orchestrator at all and there might come a point when you really want to scale out.
If you paid attention to our previous example, you may have noticed there is a count parameter
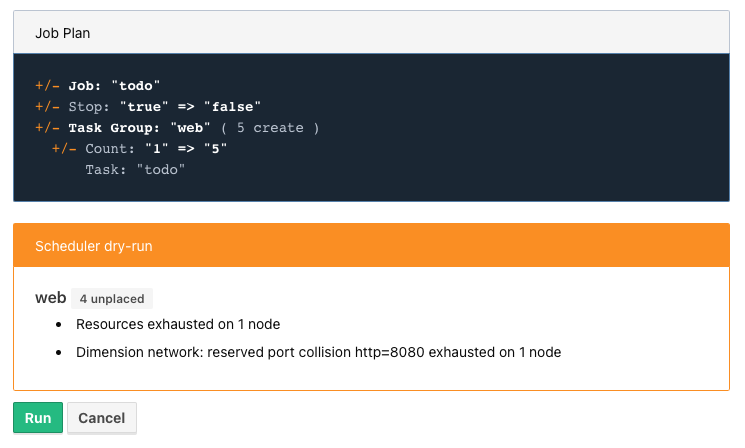
and with it we can easily increase the designated number from e.g. 1 to 5 instances:
group "web" {
count = 5
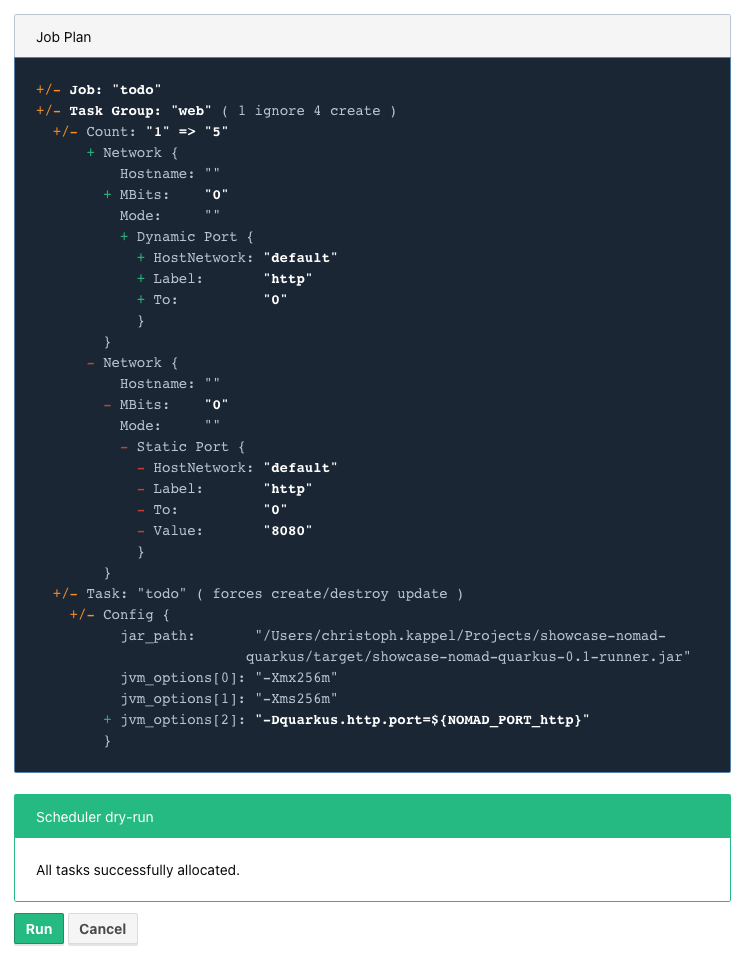
}When we start another dry-run, Nomad dutiful informs us, that we have port clash and cannot run five instances on the same port:
A simple solution here is to configure different instances and set a fixed port for each, but we can also use the dynamic port feature of Nomad:
We just have to remove the static port number from our job definition - by basically removing the configuration and force Nomad to assign ports for us now:
network {
  port "http" {}
}
Secondly, we update the driver config to include some of the logic mentioned before in HCL:
config {
  jar_path = "/Users/christoph.kappel/Projects/showcase-nomad-quarkus/target/showcase-nomad-quarkus-0.1-runner.jar"
  jvm_options = [
    "-Xmx256m", "-Xms256m",
    "-Dquarkus.http.port=${NOMAD_PORT_http}" (1)
  ]
}And if we dry-run this again, we are greeted with following:
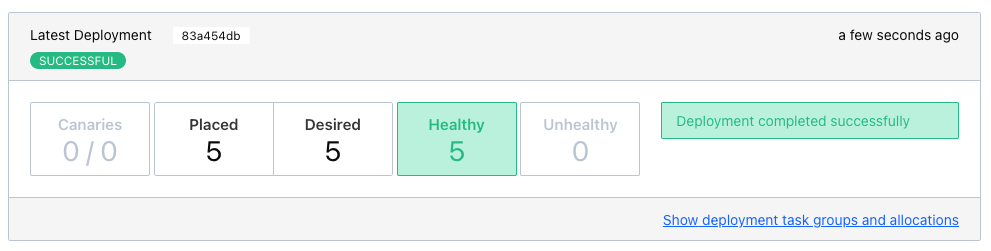
After final press of Run we can see another success and five running instances after a few seconds:
Normally, our next step should be to install some kind of load balancer, add ports and addresses of our instances and call it a day. This involves lots of manual labor and also invites problems like changes of addresses and/or ports, whenever Nomad has to make a new allocation for an instance.
Alas, this is pretty common problem and already solved for us.
Service discovery &
Service discovery is basically a central catalog and every interested service can register itself and fetch information about other registered services.
Our best pick from the many options is Consul, another product from HashiCorp, with an obviously pretty good integration.
We can facilitate Nomad\'s artifact stanza in combination with the raw/exec task driver to fetch Consul and run it directly from the internet:
job "consul" {
  datacenters = ["dc1"]

  group "consul" {
    count = 1

    task "consul" {
      driver = "raw_exec" (1)

      config {
        command = "consul"
        args    = ["agent", "-dev"]
      }

      artifact { (2)
        source = "https://releases.hashicorp.com/consul/1.12.3/consul_1.12.3_darwin_amd64.zip"
      }
    }
  }
}| 1 | Here we selected the raw/exec task driver. |
| 2 | This defines the source for the artifact we want to execute. |
The deployment is pretty much self-explanatory:
$ nomad job run jobs/consul.nomad
==> 2022-07-20T12:15:24+02:00: Monitoring evaluation "eb0330c5"
    2022-07-20T12:15:24+02:00: Evaluation triggered by job "consul"
    2022-07-20T12:15:24+02:00: Evaluation within deployment: "c16677f8"
    2022-07-20T12:15:24+02:00: Allocation "7d9626b8" created: node "68168a84", group "consul"
    2022-07-20T12:15:24+02:00: Evaluation status changed: "pending" -> "complete"
==> 2022-07-20T12:15:24+02:00: Evaluation "eb0330c5" finished with status "complete"
==> 2022-07-20T12:15:24+02:00: Monitoring deployment "c16677f8"
  ✓ Deployment "c16677f8" successful

    2022-07-20T12:15:36+02:00
    ID          = c16677f8
    Job ID      = consul
    Job Version = 0
    Status      = successful
    Description = Deployment completed successfully

    Deployed
    Task Group  Desired  Placed  Healthy  Unhealthy  Progress Deadline
    consul      1        1       1        0          2022-07-20T12:25:34+02:00
After a few seconds Consul is ready and we can have a look at its web-interface at <http://localhost:8500>:
image::consul_services_nomad.png
The service tab shows all currently registered services and we can already see that Nomad and Consul are automatically registered and listed.
In order for our services to appear, we need to add the service stanza to our example:
service {
  name = "todo"
  port = "http"

  tags = [
    "urlprefix-/todo", (1)
  ]

  check { (2)
    type     = "http"
    path     = "/"
    interval = "2s"
    timeout  = "2s"
  }
}| 1 | Nomad allows to tag services - more about this specific tag in the next section. |
| 2 | The check stanza describes how Nomad verifies, if this service is healthy. |
A quick check after our modification before we run the job to avoid surprises:
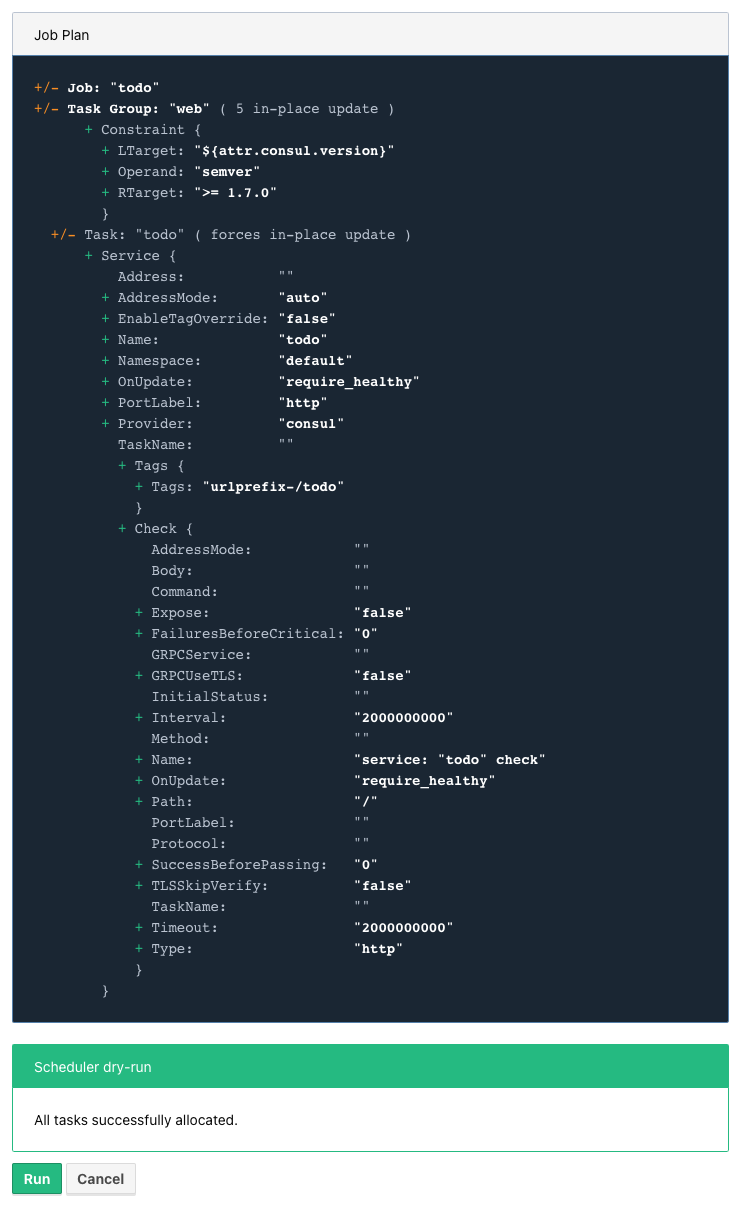
The job plan summarizes all options and sometimes gives good clues what else is possible in the configuration.
After we’ve verified everything’s alright, we run the job and can see our instances in Consul shortly after:
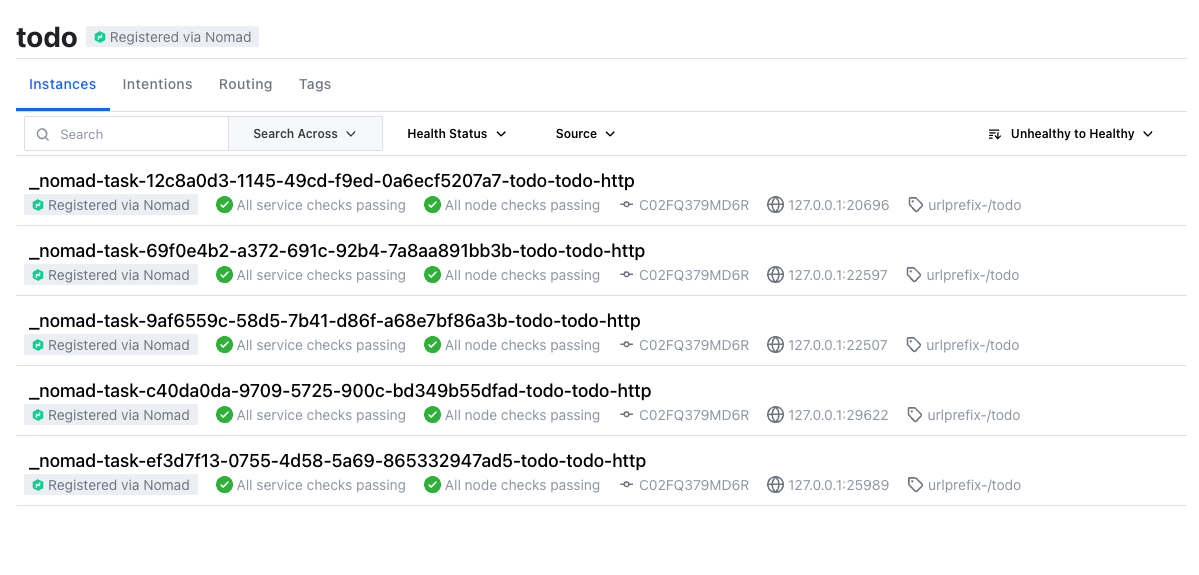
| Here we can also see the port bindings of the instances quite easily. |
And how do we route traffic to our instances?
Load balancing &
Glad that you've asked: Unfortunately, Nomad cannot do that directly and it needs again help from another tool.
One of the easiest options here with also a splendid integration of Consul is the proxy Fabio, but first things first.
Having a task scheduler at hand is really helping, so there are no surprises when we let Nomad do the work:
job "fabio" {
  datacenters = ["dc1"]

  group "fabio" {
    count = 1

    task "fabio" {
      driver = "raw_exec"
      config {
        command = "fabio"
        args    = ["-proxy.strategy=rr"] (1)
      }
      artifact {
        source      = "https://github.com/fabiolb/fabio/releases/download/v1.6.1/fabio-1.6.1-darwin_amd64"
        destination = "local/fabio"
        mode        = "file"
      }
    }
  }
}| 1 | This sets the round-robin strategy. |
$ nomad job plan jobs/fabio.nomad
+ Job: "fabio"
+ Task Group: "fabio" (1 create)
  + Task: "fabio" (forces create)

Scheduler dry-run:
- All tasks successfully allocated.

$ nomad job run jobs/fabio.nomad
==> 2022-07-19T15:53:33+02:00: Monitoring evaluation "eb13753c"
    2022-07-19T15:53:33+02:00: Evaluation triggered by job "fabio"
    2022-07-19T15:53:33+02:00: Allocation "d923c41d" created: node "dd051c02", group "fabio"
==> 2022-07-19T15:53:34+02:00: Monitoring evaluation "eb13753c"
    2022-07-19T15:53:34+02:00: Evaluation within deployment: "2c0db725"
    2022-07-19T15:53:34+02:00: Evaluation status changed: "pending" -> "complete"
==> 2022-07-19T15:53:34+02:00: Evaluation "eb13753c" finished with status "complete"
==> 2022-07-19T15:53:34+02:00: Monitoring deployment "2c0db725"
  ✓ Deployment "2c0db725" successful

    2022-07-19T15:53:46+02:00
    ID          = 2c0db725
    Job ID      = fabio
    Job Version = 0
    Status      = successful
    Description = Deployment completed successfully

    Deployed
    Task Group  Desired  Placed  Healthy  Unhealthy  Progress Deadline
    fabio       1        1       1        0          2022-07-19T16:03:45+02:00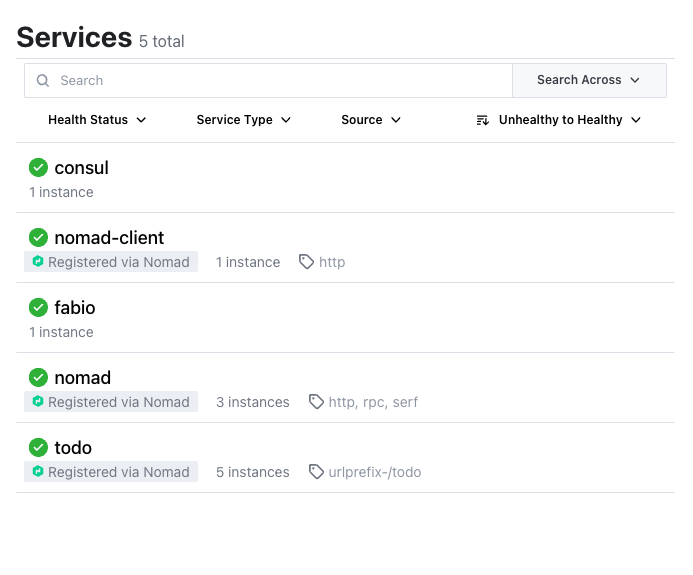
The default port of Fabio is 9999 and if we fire up again we see the expected result:
$ curl -v -H "Accept: application/json" http://localhost:9999/todo
*   Trying ::1...
* TCP_NODELAY set
* Connected to localhost (::1) port 9999 (#0)
> GET /todo HTTP/1.1
> Host: localhost:9999
> User-Agent: curl/7.64.1
> Accept: application/json
>
< HTTP/1.1 204 No Content
<
* Connection #0 to host localhost left intact
* Closing connection 0
Well, we can repeat the command from above and see the same result over and over again without a chance to verify, if it really uses different instances.
A quick hack here is to add a custom header to our instances with IP and port:
config {
  jar_path = "/Users/christoph.kappel/Projects/showcase-nomad-quarkus/target/showcase-nomad-quarkus-0.1-runner.jar"
  jvm_options = [
    "-Xmx256m", "-Xms256m",
    "-Dquarkus.http.port=${NOMAD_PORT_http}",
    "-Dquarkus.http.header.TodoServer.value=${NOMAD_IP_http}:${NOMAD_PORT_http}", (1)
    "-Dquarkus.http.header.TodoServer.path=/todo",
    "-Dquarkus.http.header.TodoServer.methods=GET"
  ]
}| 1 | The added header combining IP and port. |
$ nomad job plan jobs/todo-java-scaled-service-header.nomad
+/- Job: "todo"
+/- Task Group: "web" (1 create/destroy update, 4 ignore)
  +/- Task: "todo" (forces create/destroy update)
    +/- Config {
        jar_path:       "/Users/christoph.kappel/Projects/showcase-nomad-quarkus/target/showcase-nomad-quarkus-0.1-runner.jar"
        jvm_options[0]: "-Xmx256m"
        jvm_options[1]: "-Xms256m"
        jvm_options[2]: "-Dquarkus.http.port=${NOMAD_PORT_http}"
      + jvm_options[3]: "-Dquarkus.http.header.TodoServer.value=${NOMAD_IP_http}:${NOMAD_PORT_http}"
      + jvm_options[4]: "-Dquarkus.http.header.TodoServer.path=/todo"
      + jvm_options[5]: "-Dquarkus.http.header.TodoServer.methods=GET"
        }

$ nomad job run jobs/todo-java-scaled-service-header.nomad
==> 2022-07-20T17:03:39+02:00: Monitoring evaluation "909df36e"
    2022-07-20T17:03:39+02:00: Evaluation triggered by job "todo"
==> 2022-07-20T17:03:40+02:00: Monitoring evaluation "909df36e"
    2022-07-20T17:03:40+02:00: Evaluation within deployment: "409e814e"
    2022-07-20T17:03:40+02:00: Allocation "03e95d99" created: node "9293fb2f", group "web"
    2022-07-20T17:03:40+02:00: Evaluation status changed: "pending" -> "complete"
==> 2022-07-20T17:03:40+02:00: Evaluation "909df36e" finished with status "complete"
==> 2022-07-20T17:03:40+02:00: Monitoring deployment "409e814e"
  ✓ Deployment "409e814e" successful

    2022-07-21T14:38:50+02:00
    ID          = 409e814e
    Job ID      = todo
    Job Version = 2
    Status      = successful
    Description = Deployment completed successfully

    Deployed
    Task Group  Desired  Placed  Healthy  Unhealthy  Progress Deadline
    web         5        5       5        0          2022-07-20T17:14:49+02:00

Scheduler dry-run:
- All tasks successfully allocated.
And if we repeat the commands now:
If you wonder why this even works in the first place without any kind of configuration:
One of the nice features of Fabio is, that routes can be stored in service tags and if
you have a closer look we already did that in our example with the tag urlprefix-/todo.
This tells Fabio to redirect traffic to this prefix to instances by the same name, but there are multiple other options best described in the quickstart guide.
Update strategies &
At this point our example application is successfully running on our single node Nomad cluster. And we added a bit of fault tolerance and work distribution by putting each of the five instances into an automatic load balanced group.
How do we proceed with updates of our application?
There are multiple strategies, one of the easiest is to update all instances in the same batch, but that probably negates some of our previous efforts. Another one is to update instances one by one, check if the update succeeds and proceed with the next. A third one is to update just one instance, verify this works as intended and update the remaining ones.
All of the named strategies can be archived with the config options of the update stanza and Nomad does a rolling update by default and updates one after another until the desired size is reached:
update {
  canary       = 1 (1)
  max_parallel = 5 (2)
}| 1 | Defines how many instances should be included in a canary update. |
| 2 | This sets the actual batch size for updates. |
As a quick example, let us give a canary update a try, but first we have to consider what will happen once we start it:
A canary update with canary = 1 means, that our orchestrator starts one new instance and
waits, until we tell it to processed.
So conversely, we need means to check if the instance really works as expected and have a clear
way to distinguish it from the other instances in our group.
The previous trick with the header worked so well, why shouldn't we use it again? That said, we just add another header to our job:
config {
  jar_path = "/Users/christoph.kappel/Projects/showcase-nomad-quarkus/target/showcase-nomad-quarkus-0.1-runner.jar"
  jvm_options = [
    "-Xmx256m", "-Xms256m",
    "-Dquarkus.http.port=${NOMAD_PORT_http}",
    "-Dquarkus.http.header.TodoServer.value=${NOMAD_IP_http}:${NOMAD_PORT_http}",
    "-Dquarkus.http.header.TodoServer.path=/todo",
    "-Dquarkus.http.header.TodoServer.methods=GET",
    "-Dquarkus.http.header.TodoServerCanary.value=yes", (1)
    "-Dquarkus.http.header.TodoServer.path=/todo",
    "-Dquarkus.http.header.TodoServer.methods=GET"
  ]
}| 1 | The new header. |
Again a quick glance at the plan and the deployment can start:
$ nomad job plan jobs/todo-java-scaled-service-header-canary.nomad
+/- Job: "todo"
+/- Task Group: "web" (1 canary, 5 ignore)
+/- Update {
AutoPromote: "false"
AutoRevert: "false"
+/- Canary: "0" => "1"
HealthCheck: "checks"
HealthyDeadline: "300000000000"
+/- MaxParallel: "1" => "5"
MinHealthyTime: "10000000000"
ProgressDeadline: "600000000000"
}
+/- Task: "todo" (forces create/destroy update)
+/- Config {
jar_path: "/Users/christoph.kappel/Projects/showcase-nomad-quarkus/target/showcase-nomad-quarkus-0.1-runner.jar"
jvm_options[0]: "-Xmx256m"
jvm_options[1]: "-Xms256m"
jvm_options[2]: "-Dquarkus.http.port=${NOMAD_PORT_http}"
jvm_options[3]: "-Dquarkus.http.header.TodoServer.value=${NOMAD_IP_http}:${NOMAD_PORT_http}"
jvm_options[4]: "-Dquarkus.http.header.TodoServer.path=/todo"
jvm_options[5]: "-Dquarkus.http.header.TodoServer.methods=GET"
+ jvm_options[6]: "-Dquarkus.http.header.TodoServerCanary.value=yes"
+ jvm_options[7]: "-Dquarkus.http.header.TodoServer.path=/todo"
+ jvm_options[8]: "-Dquarkus.http.header.TodoServer.methods=GET"
}
Scheduler dry-run:
- All tasks successfully allocated.
$ nomad job run jobs/todo-java-scaled-service-header-canary.nomad
==> 2022-07-20T17:11:53+02:00: Monitoring evaluation "43bdfab2"
2022-07-20T17:11:53+02:00: Evaluation triggered by job "todo"
2022-07-20T17:11:53+02:00: Allocation "4963b7fc" created: node "9293fb2f", group "web"
==> 2022-07-20T17:11:54+02:00: Monitoring evaluation "43bdfab2"
2022-07-20T17:11:54+02:00: Evaluation within deployment: "a0c1e782"
2022-07-20T17:11:54+02:00: Allocation "4963b7fc" status changed: "pending" -> "running" (Tasks are running)
2022-07-20T17:11:54+02:00: Evaluation status changed: "pending" -> "complete"
==> 2022-07-20T17:11:54+02:00: Evaluation "43bdfab2" finished with status "complete"
==> 2022-07-20T17:11:54+02:00: Monitoring deployment "a0c1e782"
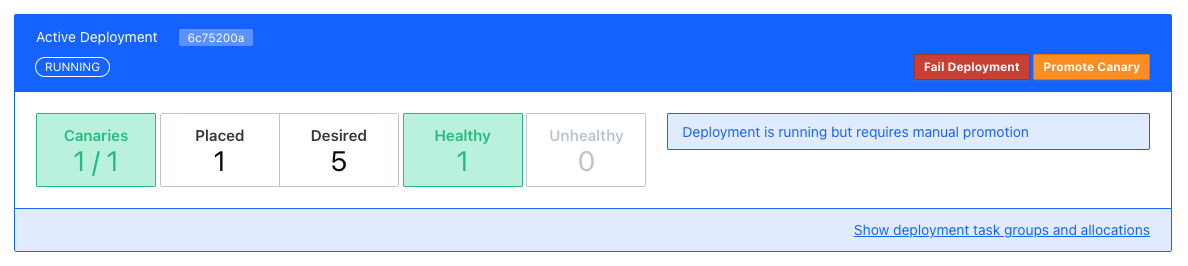
⠇ Deployment "a0c1e782" in progress...
2022-07-21T15:12:10+02:00
ID = a0c1e782
Job ID = todo
Job Version = 6
Status = running
Description = Deployment is running but requires manual promotion
Deployed
Task Group Promoted Desired Canaries Placed Healthy Unhealthy Progress Deadline
web false 5 1 1 1 0 2022-07-20T17:22:06+02:00The interesting part here is deployment actually stops and we have time to check, if our new version works properly.
No new tricks - we just re-do the curl check:
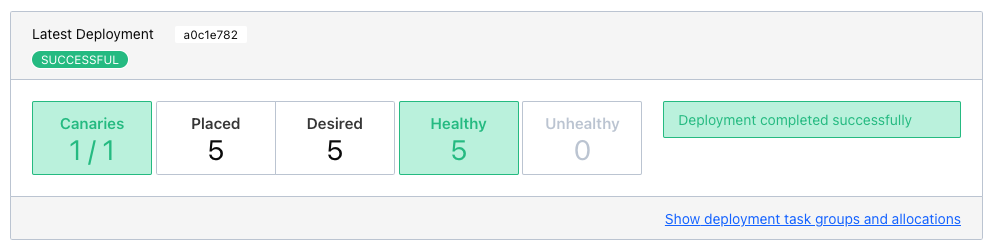
This works perfectly well, time to tell Nomad to continue with the deployment. Again, there are multiple options like the CLI job promote call, but since we still have a nice web-interface running:
After a quick press on Promote Canary, Nomad continues with the update and concludes our interrupted deployment.
Conclusion &
Nomad is a really easy to use and flexible scheduler and there a multiple benefits from the tight integration in other products - especially from direct HashiCorp products.
I think it shouldn't shy away from a comparison with Kubernetes and offers solutions to many of the daily problems like:
-
Service discovery
-
Healthchecks and failover
-
Load balancing
-
Update strategies
Most of the examples in this post can be found in my showcase: